Freitag, 29. Juni 2012

Kitchen Sink Cookies

Hi guys!


I've been craving cookies lately, but wanted to bake some myself instead of buying ones. It's hard to find a cookie, especially if you're buying them, that is the perfect balance between crunchy and soft - I like them best that way. As I bought Cynthia Barcomi's cook book which is all about baking, I wanted to try one of her recipes and decided to go with a classic. Cynthia calls them "Kitchen Sink Cookies" as they are present at her house at any time. I love that she gives a basic recipe and lots of ingredients to mix and match.


Here's the recipe:


280g (9 1/4 oz; a little less than 2 cups) all-purpose flour
1 teaspoon salt
1 teaspoon bicarbonate of soda


250g (2 sticks) unsalted butter
260g (1 1/8 cup) sugar
1 teaspoon sugar beet syrup
2 eggs
1 teaspoon vanilla extract


1) Preheat the oven to 185°C (365°F). Line a baking tray with baking paper. Mix the flour, salt and bicarbonate of soda.


2) Beat the butter until soft and creamy using a blender or kitchen machine. Add the sugar and syrup and beat until the mixture has become light and fluffy. Add the eggs and the vanilla extract and beat for a couple more minutes. 


3) Using a wooden spoon or dough scraper, mix the flour in the butter-sugar-mixture until just combined. 


4) Place tablespoons of dough on the baking tray. Make sure you leave some room between them. Bake the cookies for 10-12 minutes or until they're golden. Let cool on a cooking rack.


The recipe above is the basic dough. Now let's get your creativity going. You can add up to six ingredients by combining:

2 of the following:
100g (about 1 cup) rolled oats
80g (1/2 cup, packed) wholemeal flour
80g (1 cup) coconut
150g (2 cups) granola (whatever kind you like best)


2 of the following:
50g (1 3/4 oz; 1/2 cup) walnuts, chopped
50g (1 3/4 oz; 1/2 cup) pecans, chooped
100g (3 1/2 oz; about 1 cup) raisins
100g (3 1/2 oz; about 1 cup) cranberries
100g (3 1/2 oz; about 1 cup) dried figs; chopped


2 of the following;
100g (3 1/2 oz) dark chocolate; chopped
100g (3 1/2 oz) white chocolate; chopped
100g (3 1/2 oz) milk chocolate; chopped
100g Daim chocolate bars; chopped


Simply add your chosen ingredients in step 3.
I used chopped pecans, white chocolate, milk chocolate and cranberries for my cookies, but it's really about your mood at the very moment. 


Here's how the cookies turned out:


Have fun trying and let me know what combinations you've come up with!

Mittwoch, 27. Juni 2012

Cheat's goat-cheese soufflé

Hi guys!


I had some leftover goat cheese from this week's vegetarian recipe, so I thought I could use it to try a soufflé. This one is a savory version. It would be great to serve as a starter for a dinner party paired with bitter-leaf salad, but it is just as good served on its own for lunch or dinner. Plus: it pairs leftovers with things you keep in your fridge at any time.


Here's the recipe:


150g (4 3/4 oz) soft goat cheese 
375ml (1 1/2 cup) cream
sea salt
2 eggs, separated
140g (little less than 3 cups) fresh breadcrumbs


1) Preheat the oven to 200°C (392°F). Beat the goat cheese, cream, salt and egg yolks with a hand blender or kitchen machine until foamy. Fold in the breadcrumbs. 


2) Beat the egg whites until stiff. Carefully fold the egg whites through the cheese-cream-mixture. 


3) Grease 4 soufflé tins (12 fl. oz capacity). Equally divide the mixture between them. Bake for 20-25 minutes until they are golden brown and have risen. 
© Copyright: Donna Hay, "fast, fresh, simple", p. 81


Here's how mine turned out:


The soufflés have turned golden-brown and have risen nicely. My soufflé tins are smaller, they have a 185ml (6 fl.oz) capacity, so I only prepared half of the recipe but it worked just as good. 


Whether you like goat cheese or not, this recipe is definitely worth a try. I could imagine using feta cheese instead of the goat cheese, as well. Any cheese that has a distinct taste to it should work. 


Have fun trying!


Dienstag, 26. Juni 2012

Rocket and Tomato Pasta

Hi guys!


Monday again and time for another vegetarian recipe. It is easily prepared vegan as well. It is rocket & tomato pasta. I came across this recipe in Gwyneth Paltrow's book "Notes from my Kitchen table". I love her book whenever I am in search of vegetarian recipes. It's not an entirely vegetarian cook book, but there are a lot of vegetarian recipes or comments on how to make a recipe vegetarian or vegan. As I like to keep things simple every once in while, I love easy recipes that don't take hours of preparation. 


Here's the recipe:


2 tablespoons extra virgin olive oil
4 cloves garlic, peeled and thinly sliced
1/4 teaspoon crushed chillies
1 teaspoon fennel seeds, crushed with a mallet or pestle and mortar
3 400g cans whole peeled tomatoes with their juice
coarse salt
freshly ground black pepper
350g spaghetti, tagliatelle or fresh pasta
75g rocket (3 large handfuls)
grated Parmesan cheese, to serve


1) Heat the olive oil in a large saucepan over medium-low heat. Add the garlic, crushed chillies, and fennel, and cook, stirring for 3 minutes, or until very fragrant. 


2) Add the tomatoes and their juice, season with salt and pepper, turn the heat to high and bring to the boil. Turn the heat to medium-low and let the sauce cook on a low boil for 1 hour.


3) About 10 minutes before you're ready to eat, boil the spaghetti in salted boiling water. A minute before it's al dente, add the rocket to the pasta pan. 


4) Drain the pasta and rocket and toss them with the tomato sauce. Serve each portion with plenty of grated Parmesan.  


Serves: 4
Active preparation time: 15 minutes
Total preparation time: 1 hour and 15 minutes


Here's how mine turned out:


I put the rocket in the sauce just before serving instead of putting it in boiling water. This way, although it is wilted, they maintain a little bite which adds a great touch to the texture. The chillies and fennel seeds also add a nice twist to the tomato sauce. I am always adding a pinch of sugar to my tomato sauce, it's how I was taught. As I had dried home-made pasta, I wanted to use it instead of a store-bought kind. 


If you want to go vegan with the recipe: serve it without parmesan and cheese a pasta that is made without eggs. 


Have fun trying!

Montag, 25. Juni 2012

Tomato-Goat-Cheese-Tart

Hi guys!


It's Meat Free Monday and as summer is in full bloom, tomatoes are starting to become as sweet as they can be. Today's recipe is from Donna Hay's "fast, fresh, simple". You can either use store-bought shortcrust or make the dough yourself. If you use store-bought bases for the tarts, they are fast and simple. Baking shortcrust yourself is a little tricky at first, but once you've done it a few times, you should be fine. 


Here's the recipe:
400g (15oz) store-bought shortcrust
150g (4 3/4 oz) goat cheese, cut into slices
150g (4 3/4 oz) red and yellow cherry tomtatoes, halfed
olive oil for drizzling
sea salt and black pepper
30g (1 oz) rocket
2 tablespoons basil leafs, torn
1 tablespoon crema di balsamico


1) Preheat the oven to 180°C (356°F). Cut the dough in two circles of 18cm (7inch) width and put them on a baking tray lined with baking paper. 


2) Cut the goat cheese and half the cherry tomatoes. Arrange the cheese and the tomatoes on the shortcrust, drizzle with olive oil, season with salt and pepper. Bake for 25 minutes until golden. 


3) Mix the rocket and basil. Once the tart is baked, arrange the rocket and basil on top, drizzle with crema di balsamico and serve.


Serves: 2
© Copyright: Donna Hay, "fast, fresh, simple", p. 159.


Here's how mine turned out:  


The tarts are ready for the oven in 5-10 minutes and on the table in 30 minutes. I like the classic combination of summer ingredients like fresh tomatoes, basil and rocket in a new form. If you don't like goat cheese try buffalo mozzarella. I used a very mild goat cheese, because I prepared this for a dinner invitation and I wasn't sure if everybody was liking goat cheese. 


Have fun trying!

Sonntag, 24. Juni 2012

Home-made Pasta

Hi guys!


The weekend always lends itself to preparing dishes that take a little more time and require a little more work than the average weeknight dinner. I try taking this time whenever possible, because it makes me happy. It basically makes everyone happy as my family loves fresh, home-made pasta. I know it sounds like a tough thing to do, but it is pretty easy once you've worked up the guts to give it a try.


Here's the recipe per Person:


100g (2/3 cup) all-purpose flour
3/4 teaspoon salt
1 egg


1) Place the flour and salt in a bowl. Using your kitchen machine or hand blender with dough hooks, combine the flour with the egg. If there is flour left, add 1/2 teaspoon of water to make sure all is combined. You can also combine it with your hands.


2) Take the dough out of the bowl and knead it for about 5 minutes until it is nice and smooth. Make sure it is not sticky. It shouldn't be dry, but not too wet, either. 


At this point, the dough should rest for at least 1 hour. You can also prepare it one day and leave it in the fridge over night. 


Now get your creativity going. There's endless ways to form pasta. I normally choose the form depending on what kind of sauce I have. I like classic spaghetti with tomato sauce or in pasta carbonara and wider forms like pappardelle with a chunkier sauce. 


As I paired my pasta with sun-dried tomatoes and prosciutto di parma, I have chosen to go with a broader type, the pasta is called lasagna ricce. We have a pasta machine and a few different attachments.


If you don't have a machine, you can roll out your dough until it is really thin, dust it with some flour so it doesn't stick, layer it in two or three layers and slice it to make spaghetti, linguine or pappardelle.


Here's how they turned out:

Samstag, 23. Juni 2012

Lemon Yoghurt Cake

Hi guys!


Summer has really started to kick in so I wanted to bake something with a refreshing touch for the weekend. I skimmed through a few books and found this recipe for a lemon yoghurt cake in Donna Hay's "fast, fresh, simple". As it has been featured on the accompanying tv series, I turned to watch the video and instantly liked the simplicity. 


Here's the link to the recipe:
http://www.lifestylefood.com.au/recipes/15185/lemon-yoghurt-cake


And here's how mine turned out:


The cake is super easy to bake. All you have to do is:


1) Whisk together the vegetable oil, yoghurt, superfine sugar, lemon juice, lemon rind and eggs.


2) Sift in flour and baking powder (1 teaspoon) and stir until smooth and combined.


3) Grease a baking tin and dust with flour. Bake for 35 minutes (I needed 45 minutes until a skewer came out clean).


4) Prepare the icing and pour it over the warm cake. 


Active preparation time: 10 minutes; total preparation time: about 1 hour


A few tips and changes:
My german version of the book lists 1 teaspoon baking powder as an additional ingredient as we don't get self-raising flour. I always make sure my tins are greased and dusted with flour as I find that sometimes, even though I have greased the tin, it stays difficult to get the cake out and you risk ending up with a cake that tastes delicious but does not look like that anymore, because it wouldn't slip out of the tin. 
It is important you let the cake rest for about 10 minutes before turning it onto a cooling rack for icing. What would happen if you tried turning the cake straight from the oven is it might break, because the warmth adds instability. The cake is going to be warm enough for icing after 10 minutes, but you don't risk breaking it.


The recipe is special, because you have to pour the icing over the cake while it's still warm. The lemon juice soaks into the cake and the sugar stays nice and crunchy. Make sure you don't stir the icing too much, you should just combine the lemon juice and sugar, otherwise the sugar will dissolve in the lemon juice and you'll loose the crunch.


I love this recipe because the cake has a refreshing taste and the icing adds a special twist to it, because it differs from the usual icing sugar-lemon juice-mixture. 


Have fun trying and enjoy the sun!

Freitag, 22. Juni 2012

Chocolate Gems

Hi guys!


Today I'll give you another idea how you can sweeten the beginning of the weekend. In Germany or Switzerland alike for that matter, we love sweet things for breakfast. We are not as familiar with pancakes or waffles as americans are, but we definitely cherish baps, buns, bread rolls - whatever you want to call them. I have chosen to bake a classic sweet yeast dough and spice it up with dark chocolate for an extra surprise. The recipe is meant to make individual buns, but as I didn't have a tin of the right size, I made a loaf. 


Here's the recipe:


For the sweet yeast dough:
2 teaspoons dry yeast
5 tablespoons sugar
180ml (3/4 cup) luke warm milk 
340g (2 1/3 cup) all-purpose flour
40g (1 1/2 oz) butter, melted
1 egg yolk


1) Mix the dry yeast with 2 teaspoons of sugar and the milk. Let the mixture sit undisturbed for 5 minutes or until bubbles form on the surface.


2) Mix the flour, butter, egg yolk and leftover sugar, add the yeast-mixture and whisk until well combined. Knead the dough on a lightly dusted surface for 5 minutes. If the dough is too sticky, add a little more flour.


For the chocolate gems:
1 portion yeast dough
80g (3 oz) dark chocolate, finely chopped
1 egg yolk
2 tablespoons cream
fine sugar for sprinkling


3) Preheat the oven to 160°C (320°F). Part the dough in 6 servings. Roll each portion into a small bowl, flatten it out to an oval. Put 1/6 of chopped chocolate in the center and fold the dough on top of it. Form into a bowl again.


4) Either place each bowl in separate, greased, loaf tins (9x4.5cm; 3.5x1.7inch) or place them next to each other in a big loaf tin. Cover with a cloth and let sit undisturbed for 1 hour so the bowls double in size. 


5) Whisk the egg yolk and the cream together. Brush the dough with the mixture and sprinkle with sugar. Bake for 20 minutes until they are golden. 


Yield: 6 pieces
© Copyright: Donna Hay, "Simple essentials- chocolate", p. 50


Here's how mine turned out:


The recipe takes about 15 minutes of active preparation time and 1 hour 40 minutes of total preparation time. 
   
Have fun trying!


Dienstag, 19. Juni 2012

Too-Easy Muffins

Hi guys!


I couldn't write about muffins, or food in general actually, without sharing at least similar recipes so you can try them yourselfs and see which ones you like best. This recipe is from Donna Hay's "Fast, Fresh, Simple" and the muffins are fast. All you need is basic baking ingredients and fresh fruit and you are 40 minutes away from beautifully fragrant, fluffy muffins. 


Here's the link to the recipe: http://www.lifestylefood.com.au/recipes/15197/tooeasy-blueberry-muffins


I've used spelt flour instead of plain flour, because it is easier to digest and I like to change things every once in a while. The recipe in my german version of the book calls for 1,5 teaspoons of baking powder, because we don't get self-raising flour, but the rest is exactly the same. I replaced the blueberries for cherries that have just come in season, but are a great alternative. 


Here's how mine turned out:


I hope you are enjoying summer and all the good stuff it brings along. 


Have fun trying!

Montag, 18. Juni 2012

Vegetable Paella

Hi guys!


It's monday again and as you might guess, I am introducing you to another vegetarian recipe. This week, it is actually vegan. I have made this paella quite often and I love how great vegetables can taste. I have not been loving vegetables when I was younger. My mum must have had quite a hard time whenever she was trying to feed me or my sister vegetables and fruit as we would rather opt for her pancakes. But as I've grown older, I started paying more attention to my health so I would start experimenting with vegetable recipes in order to find a few good ones. I have developed a deep love for vegetable soups and oven-roasted vegetables, but in summer nothing beats this paella. The recipe is from Gwyneth Paltrow's "Notes from my kitchen table". 


Here's the recipe:


1l (4 cups; 32 fl.oz) vegetable stock    
2 dried shiitake or porcini mushrooms
10 cloves garlic, 4 crushed and 6 finely chopped
Large pinch saffron
1/2 teaspoon sweet pimenton
Coarse salt
freshly ground black pepper


1 large aubergine, cut into slices, ends discarded
125ml (1/2 cup; 4 fl.oz) olive oil
1 onion, finely diced
1 large tomato
2 red peppers, seeds and stem removed, cut into 2.5cm (1 inch) pieces
400g Bomba rice 
8 small artichokes, trimmed and steamed for 20 minutes, cut in half and chokes discarded
150g frozen peas
1 lemon; 2 lemons cut into wedges to serve


1) Combine the stock with the mushrooms and 4 cloves of crushes garlic in a large saucepan and boil over high heat for 10 minutes. 


Lower the heat, add the saffron and pimento and simmer for an additional 10 minutes to thoroughly combine the flavors. The secret to the recipe is a well-seasoned broth, so season to taste with salt and pepper and more saffron and/or pimento if necessary. Keep warm over low heat.


2) Meanwhile, prepare the aubergine. Sprinkle both sides of the aubergine slices with a bit of salt and lay them between sheets of kitchen paper for at least 15 minutes. 


Cut the aubergine into 2.5cm (1 inch) pieces. Heat half the olive oil in a large sauté pan set over medium heat and cook 2 cloves of garlic until fragrant, about a minute. Add the pieces of aubergine to the pan and cook for 12-15 minutes, stirring now and then, until browned and softened. Set aside.


3) Heat the remaining olive oil in a 40-45cm paella pan over high heat until just beginning to smoke. Turn the heat down to medium, add the onion and 4 remaining cloves of garlic, and cook, stirring, until just beginning to soften, about 5 minutes. Coarsely grate in the tomato, discarding the skin. Stir together and cook for another 2 minutes. Add the peppers and continue to cook the vegetables together until softened, another 10 minutes. Stir in the cooked aubergine. At this point the vegetable mixture can be set aside for up to 2 hours or refrigerated overnight. 


4) When you're ready to roll, place the paella pan with the vegetables over high heat and pour the rice into the pan in an even cross (this is how I was taught).


Add the stock and stir to combine everything. Bring to the boil and then lower the heat to a simmer. Arrange the artichokes and peas on top and simmer until the rice is cooked through, about 35 minutes. 


Remove the pan from the heat source, cover with a large piece of foil and let it sit undisturbed for 15 minutes. 

Alternatively you can cook the paella outside over a not-too-hot barbecue. Squeeze the juice of one lemon over the paella. Serve with lemon wedges. 
© Copyright: Gwyneth Paltrow, Notes from my kitchen table, p. 172


active preparation time: 1 hour
total preparation time: 1 1/2 hours
Serves: 6


Here's how it looks once its done:


I personally use 2 cloves of crushed garlic for the broth and 1-2 cloves directly in the paella, but not more. I simply don't want to smell of garlic during the following week. I also use 2 aubergines and 2 tomatoes and cut the red peppers, because I have a hard time digesting them. 
The rice: the recipe requests Bomba rice, which is the best and original spanish paella rice if you can get it somewhere, but if you can't get hold of any, you can use regular Arborio or Carnaroli rice (white risotto rice). I don't own a paella pan, but any plain metal pan works. I have never tried using "modern" non-stick pans. I also find that Bomba rice takes more moisture, so you want to keep additional hot water on the side to add if you need it.


Here's the finished paella:


Have fun trying!
  

Samstag, 16. Juni 2012

Brioche

Hi guys!


Here's an idea for an indulgent sunday morning breakfast: Brioche. You simply cannot help yourself falling in love with this french treat. The perfect brioche is rich and buttery, but has a fluffy and light texture. The perfect brioche takes its time. You will have to wait for the dough to rise repeatedly, but I promise its worth the while. The recipe is from Donna Hay's "A cook's guide". 


Here's the recipe:


1 sachet dry yeast
1 tablespoon lukewarm water
55g (1/4 cup) superfine sugar
1/4 teaspoon sea salt flakes
2 tablespoons lukewarm milk
250g (1 2/3 cups) all-purpose flour
2 eggs, lightly beaten
1 egg, for brushing
225g (almost 2 sticks) unsalted butter, softened


1) Mix the yeast and the water and let the mixture sit in a warm place for five minutes, until bubbles are appearing on the surface. In a separate bowl, mix the sugar, salt and milk. Mix the flour, yeast-mixture and eggs with a hand blender or kitchen machine and knead, using a dough hook, for one minute at low speed afterwards. Add the milk at higher speed and knead for 10 more minutes until the dough starts to detach from the bowl.


2) With the motor running add the butter, a little at a time. Knead the dough for another 6-7 minutes until it is shiny and flexible.


3) Let the dough rest in the bowl in a warm place for 2-3 hours until it has doubled its size. 


4) Split the dough in four equal parts and knead every part on a lightly dusted surface. Put them in a loaf tin (22x8cm; about 8x3 inch) afterwards and, covered with a clean dishcloth, let it rest for one more hour so it can double its size once more. Preheat the oven to 180°C (356°F). Carve every dough portion with scissors and brush with the egg. Bake for 35-40 minutes. Let the brioche rest for 10 minutes. Turn it onto a cooling rack and let it cool completely. 
© Copyright: Donna Hay, "A cook's guide", p. 96/97


Active preparation time: 20 minutes; total preparation time: about 5 hours


A few tips and informations:
I have been using a kitchen machine, but a hand blender should work as well, just make sure you're using the dough hooks. I used a slightly bigger loaf tin, because I don't own a tin sized 22x8cm. It works just as well. If you're having trouble kneading the dough, because it is sticky, make sure you dust your fingers and knead it on a cold surface. The stickiness is caused by the butter. Make sure you are letting the dough rest so it can rise. This is essential in order to make sure your brioches are fluffy.


Here's how mine turned out:


   I like it best with chocolate spread or cream cheese and jam. 


Have fun trying! 

Donnerstag, 14. Juni 2012

Blueberry Muffins

Hi guys!


Blueberry muffins are such a classic, I could not write a blog without including one fool-proof recipe for these delicious summer treats. 


Summer is starting in Switzerland again - hopefully it's here to stay! As the weekend approaches, I like to have something to knibble on and enjoy while everyone is at home. I went to the grocery store and decided on some fresh, organic blueberries that were looking great. Now I know they taste amazing as well. I like to use fresh berries and fruit as often as possible in summer, not because they are healthier than frozen fruit, they are not, but because I like the texture they add to muffins, cakes, pies or crumbles better than frozen fruit.


Here's how mine turned out:
  
I've used a recipe by Donna Hay which I consider the best muffin recipe I have tried. Believe me when I say I've tried a lot. These muffins have a beautiful texture and the dough is nice and thick which will ensure your fruit doesn't sink and end in some unrecognizable fruit purée on the bottom. 


Here's the recipe:


300g (2 cups) all-purpose flour
2 teaspoons baking powder
165g (3/4 cup) superfine sugar
240g (8 oz, about 1 1/2 cup) sour cream
2 eggs
1 teaspoon lemon zest
80 ml (1/3 cup) vegetable oil
190g (little over 6 oz) fresh blueberries


1) Preheat the oven to 180 °C (365°F). Mix the flour, sugar and baking powder in a bowl.


2) In a second bowl, stir the sour cream, eggs, lemon zest and oil. Mix it in the flour-mixture.


3) Fold in the blueberries. Line a 12-hole muffin tin with paper cases or grease with butter and fill with dough. Bake for 30-35 minutes or until a skewer comes out clean.


Yield: 12 muffins; active preparation time: 10-15 minutes; total preparation time: 45 minutes.
© Copyright: Donna Hay, A Cook's Guide, Muffins; p. 94.


These muffins are super easy; you are going to succeed every time. You could use any fruit you like, but I like them best with blueberries or raspberries. 


Have fun trying and soak up some sun over the weekend!
  

Dienstag, 12. Juni 2012

Gnocchi-Vegetable-Casserole

Hi guys!


As I've promised you yesterday, I am going to share the vegetarian lunch I've had with you. I originally wanted to enjoy my gnocchi with some basic tomato sauce. Simple, easy but so delicious. I had some green asparagus, mushrooms and cherry tomatoes in the fridge that I wanted to incorporate. I didn't want the mixture to get too dry, so I cooked some tomato sauce and combined it with the gnocchi and vegetables.


Here's how the result turned out:


I've been using:


500g raw Gnocchi
500g green asparagus
250g mushrooms
200g cherry tomatoes
500ml (2 cups) tomato sauce


1) Cook the gnocchi in salted water until they float to the top.
2) Chop the asparagus, slice the mushrooms and half the cherry tomatoes. Cook the vegetables in a pan until just softened.
3) Layer tomato sauce, gnocchi, vegetables and more tomato sauce in a casserole. 
4) Bake in the oven at 180°C (356°F) for about 15 minutes. 


Serves: 4-5 people


You can add fresh mozzarella before baking or other cheese, if you like. I wanted to stay healthy for this one, so I did it without cheese. This dish is really light and ideal for summer - lunch or dinner. I am going to share my recipe for fool-proof tomato sauce another time.


Have fun trying and enjoy your summer! 

Montag, 11. Juni 2012

Home-made Gnocchi

Hi guys!


It's Meat Free Monday again and I've been looking for something other than pasta or rice this week, so I've chosen gnocchi. Originating from Italy, they are little small potato-flour-rounds cooked in salted water. I love that they are incredibly versatile. You can pair them with any sauce you like. Paired with cheesy, creamy Gorgonzola sauce they are a classic dish, but they are just as tasteful accompanied by a light Tomato sauce or any type of pesto. You can buy them at any grocery store or get down to business and make them yourself. It's not as hard as you might expect. I am going to take you through the recipe step by step. It's actually quite fool-proof.


Here's the recipe:


1 kg starchy potatoes
coarse sea salt
100g (2/3 cup) all-purpose flour
salt
pepper
2 egg yolks


Preheat the oven to 180°C (356°F). Line a baking tray with salt. Be sure to use a generous amount. The salt will help absorb the moisture from the potatoes which is crucial for ending up with fluffy gnocchi. Place the potatoes on the baking tray and cook them in the oven for 1 hour. 


When they're cooked, scrape the flesh out of the shell with a tablespoon and place in bowl. Mash the flesh using a masher or a ricer. The texture might vary depending on what tool you're using. I am using a masher.


Add the flour, salt and pepper for seasoning and mix to combine. Add the egg yolks and stir until a uniform mixture. Knead the dough for about a minute on a lightly dusted surface. Don't knead your dough too much, because the gluten will be set free and make your gnocchi tough rather than light and fluffy. 


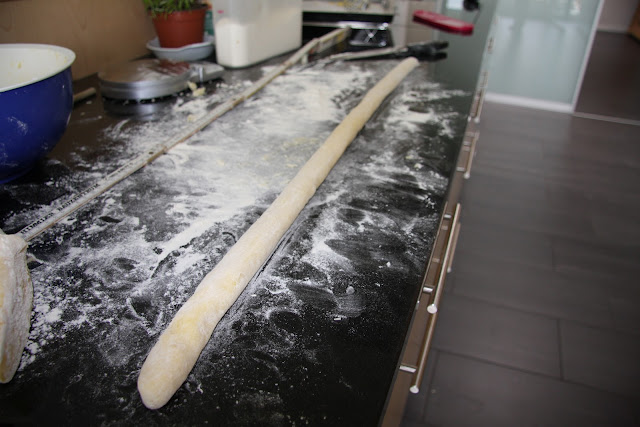
Split the dough in half. Roll each half to a string of about 2cm width (a little less than one inch).  


Cut the string into 2cm (little less than one inch) pieces and spread on a flour-dusted baking tray. Use measuring tape or a ruler to ensure even-sized gnocchi. They should be the same size to make sure they are cooking at the same time later.


At this point, you can freeze any excess gnocchi. I like to make a huge batch and freeze them for later use. That way, you have to work once and can benefit from it later.


Making gnocchi is a great Sunday project when you have some spare time. I have thrown mine in the oven with a few different kind of vegetables and a splash of basic tomato sauce. I will share the recipe with you tomorrow!


Have fun trying! I promise it's worth the effort!

Samstag, 9. Juni 2012

Banana Bread, Pt. 2

Hi guys!


Weekend is here and I wanted to bake something again. As I told you last week, I love the Donna Hay magazine app so I decided to try her banana bread. I wanted to stick with a classic version, although she gives various ideas for additions like raspberries, dates, chocolate or peanut butter. The recipe is very easy to make and the result is just amazing.


Here's how mine turned out:

The recipe:

125g (1 stick) unsalted butter, softened
175g (1 cup) brown sugar
1 teaspoon vanilla extract
2 eggs
225g (1 3/4 cup) all-purpose flour
1 teaspoon baking powder
1 teaspoon bicarbonate of soda
1 teaspoon ground cinnamon 
2 cups (ca. 6 or 7) bananas, mashed
115g (1/3 cup) golden syrup
100g chopped nuts (by choice)


1) Preheat the oven to 160°C (320°F). Combine the butter, sugar and vanilla extract in a bowl and beat for 8-10 minutes. It's easiest to use a hand blender or kitchen machine. 


2) Gradually add the eggs and beat well.


3) Add the mashed banana, cinnamon and soda and sift in the flour and baking powder. Stir to combine. Add the golden syrup and combine. Fold in the chopped nuts (walnuts, pecans work great), if using them. Put it into a greased and floured loaf tin (11x26cm; ca. 4x10inch).


4) Bake for 60-65 minutes or until cooked when tested with a skewer. Cool in the tin for 20 minutes, turn on a cooling rack.


It took about 25 minutes to prepare the dough. My banana bread took quite a bit longer to bake until completely cooked. I left it in the oven for 70 or 75 minutes. Golden syrup it a typically british and australian ingredient to use. The syrup is a form of inverted sugar syrup that's made in the process of refining sugar cane into sugar. It can be hard to get, but it's worth the search. I found the original british Lyle's golden syrup at a delicatessen store in the city centre. If you're in Germany and you can't find any, you can substitute Grafschafter Zuckerrübensirup. It's a little different in taste, but as close as you can get.


I like this banana bread even better than the version by Cynthia Barcomi which has been my favorite until now. I am definitely going to bake it again and try the fancier versions of it.


Have fun trying and have a great weekend!